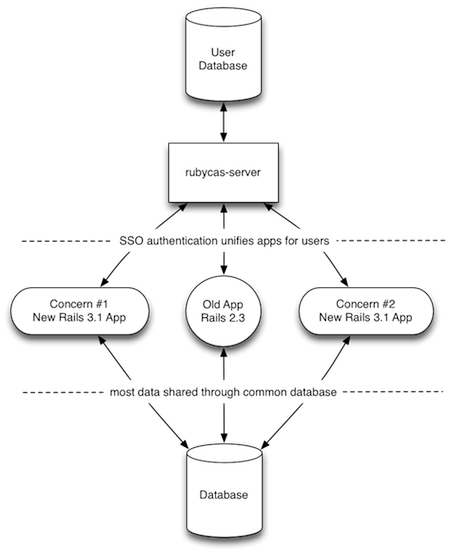
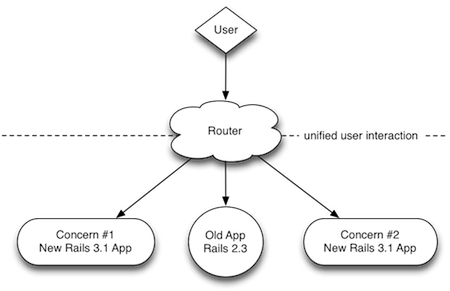
I’m planning on publishing a series of posts about how to properly set-up a working Single-Sign-On server and integrating it with Rails 2.3 Apps as well as Rails 3.1 Apps.
My goal is to show you how to migrate a huge “old” Rails 2.3 Apps into multiple new & smaller Rails 3.1 Apps. For some time, these new Apps will coexist with the old system, until the old App is replaced in its entirety by new Apps. If there is no need to replace the old App entirely you can stop along the way, with a mixture of old and new.
This is a possible way to go if your old Rails App is too huge to be converted to Rails 3.1 in a single step. So let’s get started… but first: some visualisations!


#0: Preparations
First, we’ll take care of Single-Sign-On since that’ll enable use to check if a user session exists on one of the Apps.
In order to do that you’ll need to download rubycas-server.
Go a head and git clone https://github.com/rubycas/rubycas-server.git first.
Note that I’m assuming you’re using Mac OS X, Homebrew, pow & MySQL. I’m also assuming your using rvm & powder.
Things will vary depending on your setup.
#1: Getting rubycas-server to start
Next you need to create a configuration file so your rubycas-server works properly. cd into the rubycas-server directory and run
$ cp config/config.example.yml config/config.yml
$ sudo mkdir -p /etc/rubycas-server
$ cd /etc/rubycas-server
$ sudo ln -s $OLDPWD/config/config.yml .
$ cd -
This will create a configuration file and symlink it to /etc/rubycas-server/config.yml, as required by rubycas-server.
Now it’s time to change the example configuration. Make sure to change the following points:
database- database used to store SSO Session Ticketsauthenticator- one or more authentication rules to verify user credentialslog- place to store your log files
The example configuration file is full of good examples on how to properly set up these points. As a note: I prefer to change log to
log:
  file: log/casserver.log
  level: INFO
So all log output get’s redirected relative to my App folder. For demonstration purpose I’m also going to stick with this authenicator configuration:
authenticator:
  class: CASServer::Authenticators::SQL
  database:
    adapter: mysql
    database: casserver
    # your database information here
  user_table: users
  username_column: username
  password_column: password
  extra_attributes:
Now, all that’s left to do is:
- run
bundle install && bundle update. This should install all dependencies, and work out of the box - run
rackupto see if you are able to start rubycas-server on your machine - if
rackupworked for you, runpowder linkto publish your server underhttp://rubycas-server.dev
#2: Creating a users table
Since you’re rubycas-server only manages authentication, you’ll have to create a users table on your own. For now, login into mysql and run something like this:
CREATE TABLE `users` (
  `id` int(11) unsigned NOT NULL AUTO_INCREMENT,
  `username` varchar(32) NOT NULL DEFAULT '',
  `password` varchar(32) NOT NULL DEFAULT '',
  PRIMARY KEY (`id`)
) ENGINE=InnoDB AUTO_INCREMENT=4 DEFAULT CHARSET=utf8;
This will create a users table where you can directly enter username / password combinations for testing. In a production environment I’d write a separate User Management Application - just note that you’ll have to factor out your password encryption scheme into a module or similar, so you can share it between your rubycas-server and your user management app. But more on that in a later post.
#3: Important considerations
When configuring an authenticator you have to consider your old users. Some point of interest should be:
- is it possible to force all users to enter a new password in order to continue using your app?
- if not, how does your current authentication routing work? You need to move this into a module or inline it in your config.yml!
#4: Small check:
Fire up your browser and visit http://rubycas-server.dev. If all went well you should see a login form.
If you entered dummy data into the users table shown above you should be able to log-in with them now.
Next up:
Configuring your rubycas-server to authenticate using your existing Devise user data.