With the introduction of the Swift programming language Apple also introduced Playgrounds, interactive environments for easy sharing & prototyping.
Today I want to share a tiny example on how to use them to prototype custom UIViews. Specifically a PolarClock. You can download the complete Playground here.
I love playgrounds because they allow you to quickly sketch ideas, and visualize steps, before heading for a fully fledged implementation. Let’s try it out:
First, open a recent XCode (I’m using 7.2) and create a new Playground.
We’ll start by constructing a circle using polar coordinates:
let radius = 50.0
var points = [CGPoint]()
for degree in 0.stride(to: 360.0, by: 10) {
  let theta = (90 + degree) * M_PI / 180.0
  let x = radius * cos(theta)
  let y = radius * sin(theta)
  let p = CGPoint(x: -x, y: y)
  points.append(p)
}
While you can not visualize [CGPoint] with Playgrounds, you can visualize a UIBezierPath:
let bezierPath = UIBezierPath()
bezierPath.moveToPoint(points[0])
for var i = 1; i < points.endIndex; i++ {
  bezierPath.addLineToPoint(points[i])
}
bezierPath
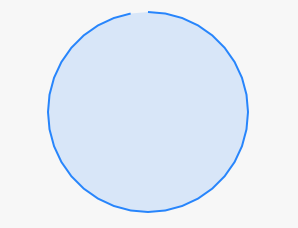
When you click the visualization button you should see a circle:
Let’s wrap this in a tiny UIView, called Polar:
import UIKit

public class Polar: UIView {
  public var radius: CGFloat = 20
  public var completeness: CGFloat = 0.1 {
    didSet {
      self.setNeedsDisplay()
    }
  }
  public var strokeWidth: CGFloat = 10
  public var stepSize: CGFloat = 0.25
  public var color: UIColor = UIColor.redColor()

  func path(ps: [CGPoint]) -> UIBezierPath {
    let bezierPath = UIBezierPath()
    bezierPath.lineJoinStyle = .Round
    bezierPath.fillWithBlendMode(.Normal, alpha: 0.0)
    bezierPath.moveToPoint(ps[0])
    for var i = 1; i < ps.endIndex; i++ {
      bezierPath.addLineToPoint(ps[i])
    }
    return bezierPath
  }

  func circle(radius: Double) -> [CGPoint] {
    var points = [CGPoint]()
    let center = CGPoint(x: self.frame.width/2, y: self.frame.height/2)

    for degree in 0.0.stride(to: 360.0*Double(self.completeness), by: Double(self.stepSize)) {
      let theta = (270 + degree) * M_PI / 180.0
      let x = radius * cos(theta)
      let y = radius * sin(theta)
      let p = CGPoint(x: Double(center.x)+x, y: Double(center.y)+y)
      points.append(p)
    }

    return points
  }

  public override func drawRect(rect: CGRect) {
    let ctx = UIGraphicsGetCurrentContext()
    CGContextSetLineWidth(ctx, self.strokeWidth)
    CGContextAddPath(ctx, path(circle(Double(self.radius))).CGPath)
    self.color.set()
    CGContextStrokePath(ctx)
  }
}
The Polar view just placed the above code in separate functions and added some
properties, as well as a drawRect method to display the view.
The observing reader might spot the changed theta calculation; this is necessary because the coordinates system for UIViews is different than the preview in the playground. To support a clockwise rotation at the center we start at 270°.
Finally, let’s use the class to build a real PolarClock:
let frame = CGRect(x: 0, y: 0, width: 375, height: 667)
let view = UIView(frame: frame)
XCPShowView("PolarClock", view: view)

let colors = [
  UIColor(red: 23.0/255.0, green: 170.0/255.0, blue: 178.0/255.0, alpha: 1.0),
  UIColor(red: 255.0/255.0, green: 32.0/255.0, blue: 172.0/255.0, alpha: 1.0),
  UIColor(red: 7.0/255.0, green: 241.0/255.0, blue: 255.0/255.0, alpha: 1.0)
]

let clockFrame = CGRect(x: 100, y: 100, width: 100, height: 100)
let clock = (
  Polar(frame: clockFrame),
  Polar(frame: clockFrame),
  Polar(frame: clockFrame)
)
clock.0.backgroundColor = UIColor(red: 0, green: 0, blue: 0, alpha: 0)
clock.0.color = colors[0]
clock.0.radius = 45.0
view.addSubview(clock.0)

clock.1.backgroundColor = UIColor(red: 0, green: 0, blue: 0, alpha: 0)
clock.1.color = colors[1]
clock.1.radius = 35.0
view.addSubview(clock.1)

clock.2.backgroundColor = UIColor(red: 0, green: 0, blue: 0, alpha: 0)
clock.2.color = colors[2]
clock.2.radius = 25.0
view.addSubview(clock.2)

let timer = dispatch_source_create(DISPATCH_SOURCE_TYPE_TIMER, 0, 0, dispatch_get_main_queue())
dispatch_source_set_timer(timer, DISPATCH_TIME_NOW, 1 * NSEC_PER_SEC, 0)
dispatch_source_set_event_handler(timer) {
  let now = NSDate()
  let calendar = NSCalendar.currentCalendar()
  let components = calendar.components([NSCalendarUnit.Hour, NSCalendarUnit.Minute, NSCalendarUnit.Second], fromDate: now)
  let hour = components.hour
  let minutes = components.minute
  let seconds = components.second

  clock.0.completeness = CGFloat(hour) / 24.0
  clock.1.completeness = CGFloat(minutes) / 60.0
  clock.2.completeness = CGFloat(seconds) / 60.0
}
dispatch_resume(timer)
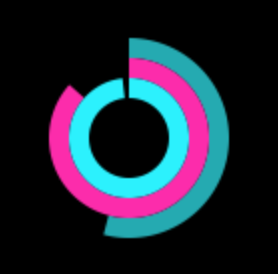
You’ll see something like this, before the playground terminates after some seconds:
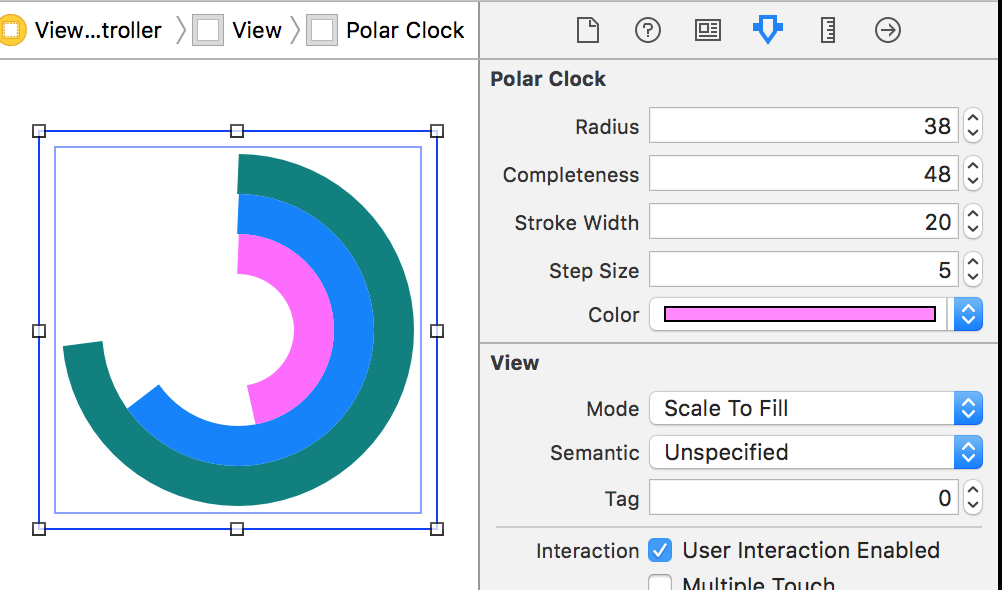
That’s it! Now it’s just a tiny step to implement the @IBDesignable and use the class inside interface builder:
@IBDesignable
public class Polar: UIView {
  @IBInspectable public var radius: CGFloat = 20
  @IBInspectable public var completeness: CGFloat = 0.1
  @IBInspectable public var strokeWidth: CGFloat = 10
  @IBInspectable public var stepSize: CGFloat = 0.25
  @IBInspectable public var color: UIColor = UIColor.redColor()
  // … omitted
}
Now you can also use your Polar view inside interface builder:
I love that you can easily prototype complete views with Playgrounds. The only catch is that only Swift is supported right now, so hopefully you can live without a debugger.
All in all the XCode playgrounds are awesome to share executable code, teach and learn. You should use them probably, too.
Anyway, that’s it for today. Happy hacking!